Starting your photography business can be an overwhelming yet rewarding journey.
From deciding what prices are reasonable to the aftermath of the photoshoot, photographers are always learning and on the go. At times we tend to get overwhelmed with the amount of “to-do” things we have to accomplish in order to improve our business.
Here are 4 things I wish someone would’ve told me when I decided to move forward with my very own official photography business.
1. Only Shoot in RAW

The left picture is harder to bring the highlights down for their skin and if you zoom in on both, the left side is way more grainy.
Yea. I know what you’re thinking. “But shouldn’t you shoot RAW + JPEG to keep a copy, just in case?” The simple answer: not necessarily.
By shooting in RAW, your editing capabilities and picture quality will skyrocket. That picture that needs correction because the lighting isn’t that great? Fixed. What about that other picture that’s too grainy to send to your client? Fixed as well. When editing your pictures in Lightroom with RAW images, it is amazing the amount of flexibility the picture now has.
Shooting in RAW allows you to smoothly balance out the exposure, increase picture quality, and achieve better looking prints all while controlling your highlights better. When editing with JPEG pictures, on the other hand, they loses quality every time you open and edit the files.
*Extra Tip: If you open up Lightroom and plug in your SD card, Lightroom should automatically open your pictures. Use this feature to pick out the best photos, edit, and download them as high quality JPEGs. By doing this you avoid saving RAW images to your desktop, freeing you of space!
2. Create Packages for Your Clients
I really wished I started this one earlier a lot earlier in my photography journey.
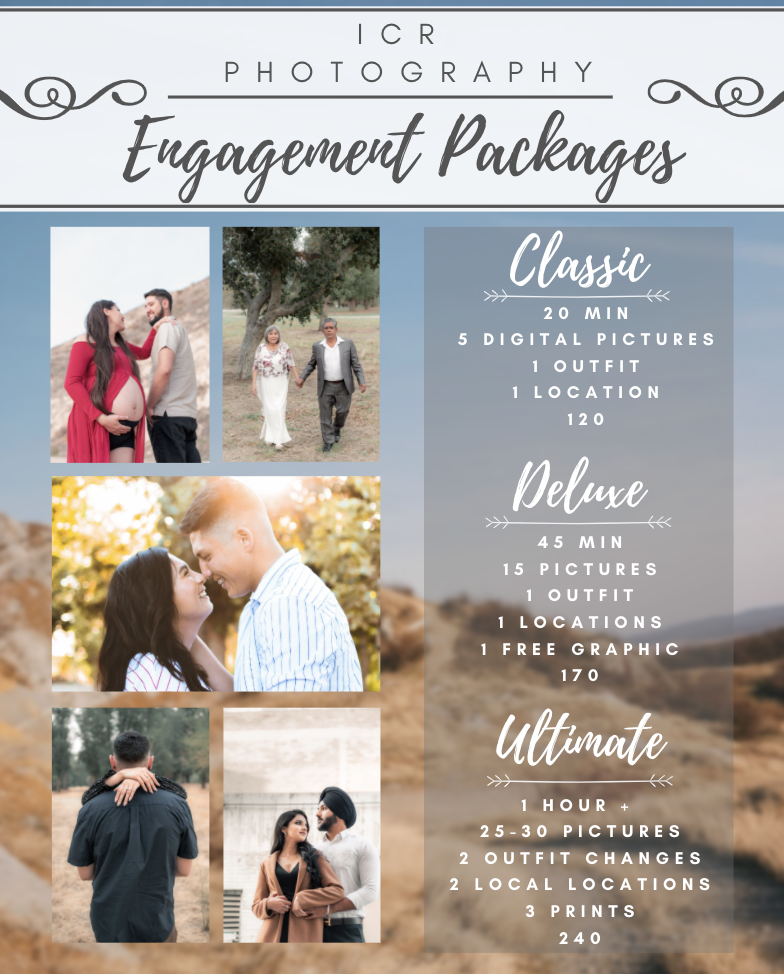
Note: When I say “packages”, I mean there is certain packages for each category of photography that I offer. For example, my couple sessions have 3 packages, my family sessions have 3 packages, etc.
By not creating packages from the very beginning, I lost A LOT of revenue. By creating packages, not only do you give your customers a more flexible choice when booking with you, but it also empowers you to provide more value and provide ad-ons.
I spent time researching the psychology of pricing. Turns out, it is literally everywhere we turn! From picking the size of your drink at your favorite coffee shop to memberships of all kind, we have all seen it! The psychology of pricing is carefully designed for the consumer to choose the medium priced item– and that’s exactly what I did for my photography packages.
I knew from the start that I wanted three packages, ranging from the lowest price to the most expensive. I thought of names for each package, names that would make the package seem more appealing and overall unique to the client. After brainstorming a few names, I came with something simple yet effective for each package: Basic, Deluxe, and Ultimate.
(Using this tactic, I saw my profits go up, up, and away. From making only $60-$80 per photoshoot to $130 per shoot! I’ve also had clients that see the value of the ultimate and book it. How cool is that? Not only are you providing flexible options but you are also making extra cash on top of what would’ve been a regular session.)
3. Buying a Decent SD Card
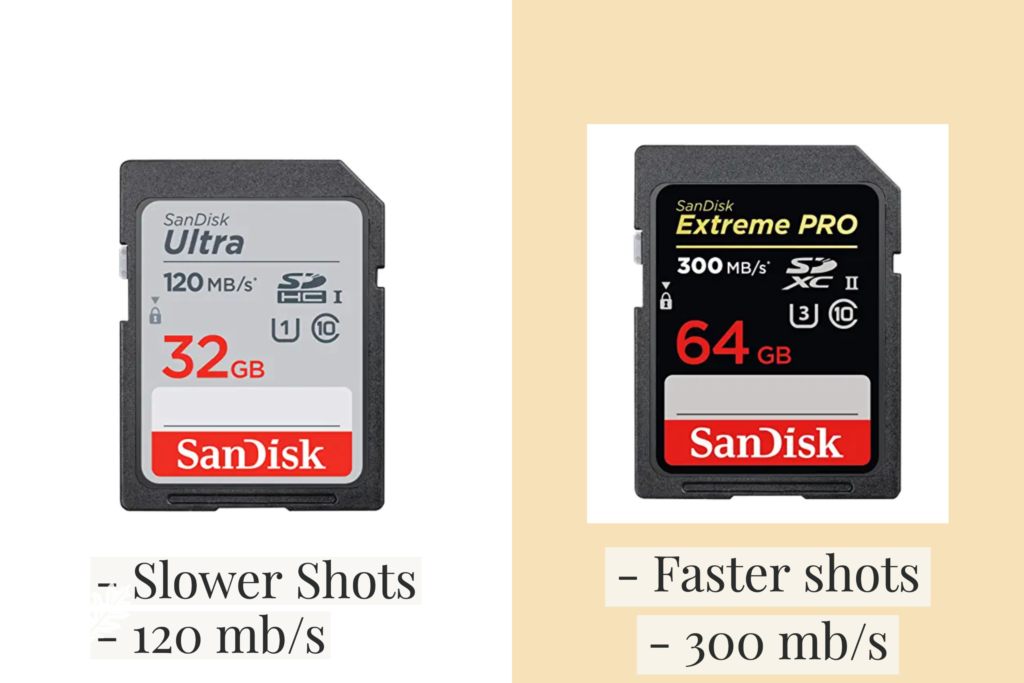
This one should be an obvious one, right?
Well unfortunately to me it wasn’t. I realized that my ability to capture more pictures per mili-second wasn’t where I wanted it to be. My camera (a Nikon D3300, btw) was gradually slowing down when shooting in continuous mode, something that really bothered me when I was in the middle of a session.
It got to a point where I was already Googling new cameras. Luckily I did my research (again) and found out that this issue had a simple fix. Simply by buying an upgraded Class 10 SD card! An SD card with the highest mb/s will shoot faster continuous shots while never missing a moment (and great for action shots as well!)
Note: You can also increase the rate of pictures being taken per second by shooting in RAW
4. Back Button Focus
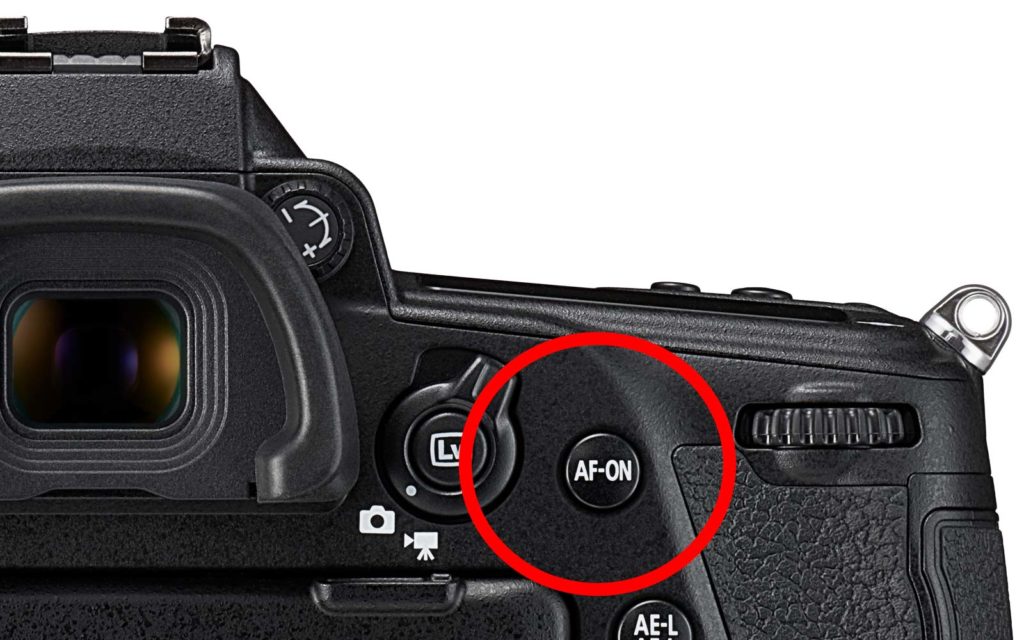
I am truly embarrassed to say that I learned this tip years after I started. The feeling of regret is there, alright. But it is important to mention it.
Most cameras (check your manual) have a button that is called back button focus, of BBF for short. For other cameras it is the “AF-ON” button.
If you haven’t paid attention to this small but powerful button, now is your chance. To summarize, this button allows you to manually control your focus instead of relying on the shutter button and pressing it halfways to focus. What does this mean to you? More flexibility of your focus point, faster continuous shots, and a more efficient photoshoot!
Now I will tell you that getting the hang of this can take some time. For me the hardest part is to capture a moving object while using this feature (watch the video below to learn how!). Yes it will take some practice, yes it can take some time to get used to, but I believe the struggle is worth it. Muscle memory should take its course eventually.
Even if you don’t like it, you can always go back to the traditional way of focusing. You never know until ya try it 😉
Check out this video to learn more about back button focus:

About Me
Just an earth loving, adventure chasing, caffeinated photographer.
Hi! My name is Ignacio and I am based in Southern California specializing in couple, wedding + elopement, and lifestyle photography. My goal is to not only gift others precious memories, it is to teach others the essentials and more about the amazing art of photography. Stay in touch for more blog posts!